
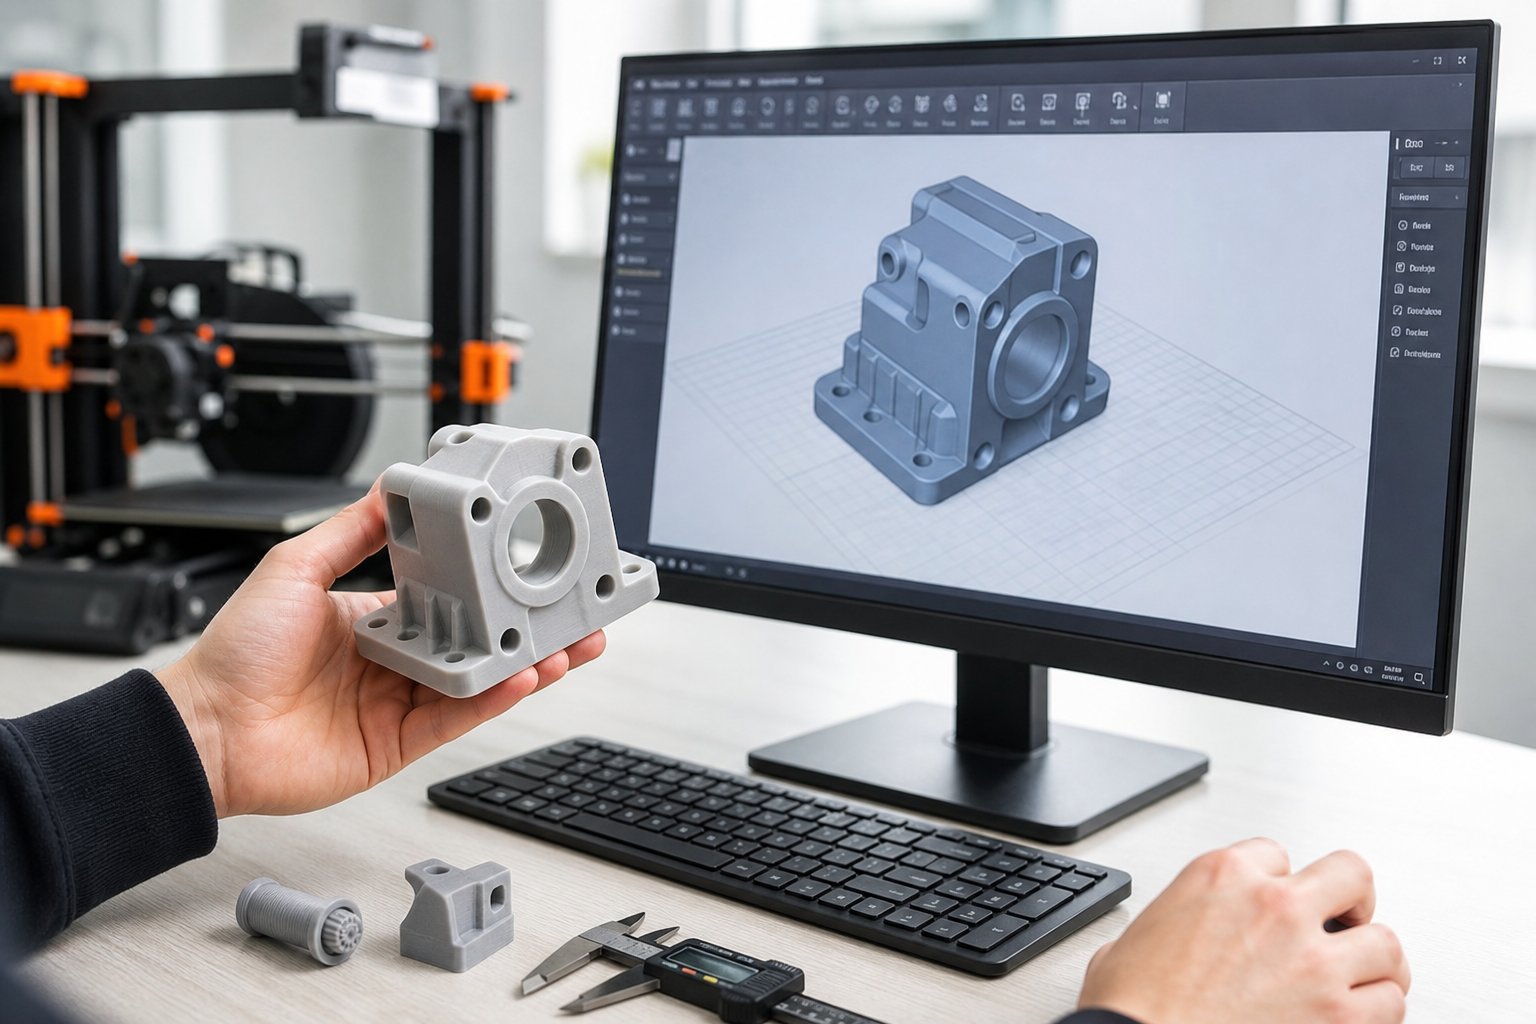
Every 3D print starts as a file, not a filament. Before you can pick a resin or a spool of filament, you need a 3D model that's actually built to print, not just built to look good on a screen. Learning how to make 3D models for printing is the one skill that decides whether your project comes out clean on the first try or fails halfway through the build plate.
The good news: you don't need an engineering degree or expensive software to start. You need the right tool for your project, a basic understanding of what a printer can and can't physically do, and a workflow that catches mistakes before they cost you a spool of filament.
This guide walks through every stage, from choosing software to exporting a printable file, so your next design goes from screen to printer without a single failed layer.
🧱Key Takeaways
- •You can make 3D models for printing by sketching CAD shapes, sculpting in a mesh editor, scanning a real object, or generating one from an image
- •Tinkercad suits beginners, Fusion 360 suits mechanical parts, and Blender suits organic or artistic shapes
- •Every printable model must be a closed, manifold mesh with no holes, flipped normals, or self-intersecting faces
- •Wall thickness, overhang angle, and build volume are the three limits that make or break a design
- •STL is the universal export format, but 3MF carries more data and is becoming the better default
What "Printable" Actually Means for a 3D Model

A 3D model and a printable 3D model aren't the same thing. A model made for animation or rendering can have open edges, overlapping faces, or gaps you'd never notice on screen. None of that flies with a printer, because a slicer needs a watertight surface to know what's inside the object and what's outside it.
That's the core idea behind learning how to make 3D models for printing: every shape needs to describe a solid, closed volume with no contradictions in its geometry.
Manifold Geometry
A manifold mesh is a fully enclosed surface where every edge connects exactly two faces. No loose edges, no holes, no internal faces poking through the outer shell.
Wall Thickness
Every wall in your design needs enough thickness to survive printing and handling. A wall thinner than your nozzle diameter on an FDM printer often won't print at all.
Overhangs and Support Needs
Surfaces that hang out into open air past roughly 45 degrees usually need support material underneath. Designing around that angle from the start means fewer supports to remove later.
Once your model satisfies these three conditions, you've covered most of what separates a digital sculpture from a printable part.
Four Ways to Get a 3D Model
There's more than one starting point for a printable file. Which route makes sense depends on whether you're designing from scratch, copying something that already exists, or starting from a photo.
Design It From Scratch in CAD
Computer-Aided Design (CAD) software lets you build a model from primitive shapes, sketches, or parametric features. This is the route for mechanical parts, brackets, enclosures, and anything that needs exact dimensions.
Sculpt It in a Mesh Editor
Mesh-based tools work more like digital clay. You push, pull, and smooth a surface freely, which suits figurines, organic shapes, and artistic pieces where exact measurements matter less than form.
Scan a Real Object
3D scanners, and even some smartphone apps, can capture a physical object and convert it into a mesh. This is useful for replacement parts, custom-fit items, or replicating something you already own.
Download or Convert an Existing File
You don't always have to model from zero. Thousands of ready-made STL files exist on sites like Printables, MakerWorld, and Thingiverse, and tools exist to turn a flat image into a 3D mesh.
Choosing the Right 3D Modeling Software
The software you pick shapes your entire workflow, so it's worth matching the tool to the project instead of forcing one program to do everything.
Tinkercad for Beginners
Tinkercad is free, browser-based, and built around combining basic shapes. There's nothing to install and almost nothing to learn before your first model, which makes it the easiest on-ramp into how to make 3D models for printing.
Fusion 360 for Precision Parts
Fusion 360 is parametric CAD software built for engineering accuracy. It's the better choice once your project needs exact tolerances, threads, or mechanical fit, like a bracket or a replacement part.
Blender for Organic and Artistic Models
Blender is a free, open-source 3D suite that leans toward sculpting, characters, and decorative pieces where curved, irregular surfaces matter more than precise measurements.
Pick one program and stay with it until you're comfortable. Switching tools too early just resets your learning curve without adding much value.
| Software | Best For | Skill Level | Cost |
|---|---|---|---|
| Tinkercad | Simple shapes, keychains, learning the basics | Beginner | Free |
| Fusion 360 | Mechanical parts, brackets, precise fits | Intermediate | Free for hobbyists |
| Blender | Figurines, organic shapes, decorative models | Intermediate to Advanced | Free |
| Meshmixer | Mesh repair, splitting large models, hollowing | Beginner to Intermediate | Free |
Designing Within Your Printer's Limits

Every printer has physical boundaries, and designing around them up front saves far more time than fixing a failed print after the fact.
Build Volume
If your model is bigger than your printer's bed, you'll need to scale it down or split it into sections that print separately and get assembled afterward.
Overhang Angles
Most desktop printers struggle with overhangs steeper than 45 degrees without added support material. Tilting or reshaping a design can sometimes remove the need for supports entirely.
Minimum Wall Thickness
A wall narrower than your nozzle diameter, or thinner than a resin printer's minimum cure thickness, risks printing as a gap instead of a solid wall.
Sketching your idea on paper first, even roughly, helps you catch sizing and fit problems before you've spent an hour modeling something that won't physically work.
Checking and Repairing Your Mesh Before Export
Even a carefully built model can carry hidden errors. Running a mesh check before export catches problems a slicer would otherwise flag, or worse, silently misinterpret.
Look for Holes and Gaps
Any opening in the surface breaks the "closed volume" rule a slicer depends on. Mesh repair tools can usually patch small holes automatically.
Fix Flipped Normals
Every face has a direction it's "facing." When normals point inward instead of outward, slicers can read solid sections as hollow, or vice versa.
Remove Self-Intersecting Geometry
Overlapping faces confuse the slicer about which surface is the actual boundary of the object, which can cause missing walls or extra material in the wrong places.
Free tools like Meshmixer and MeshLab are built specifically for this kind of mesh cleanup, and most modeling programs include a built-in repair or analysis function as well.
Exporting Your File for Printing
Once your model passes a mesh check, exporting it correctly is the last step before it reaches your slicer.
STL: The Universal Default
STL is the format almost every printer and slicer expects. It stores only the mesh geometry, which keeps files lean but means it can't carry color or multi-material data.
3MF: The Modern Alternative
3MF files can store color, material assignments, and even slicer settings alongside the geometry, which makes them increasingly common for multi-color and multi-material prints.
OBJ: For Color and Texture Work
OBJ supports textures and color maps, which makes it useful for full-color resin or multi-material prints where surface detail matters.
When you're not sure which format your printer prefers, STL remains the safest default, since virtually every slicer can read it without conversion.
From Model to Material
Once your file is exported and sliced, the material you choose decides whether your design survives daily use or snaps on the first drop. Browse Siraya's resins and filaments to match your printable model to the right material.
Explore Siraya Materials →

Slicing: Turning Your Model Into a Printable File
Modeling and slicing are two separate steps. The model defines the shape; the slicer translates that shape into the layer-by-layer instructions your printer actually follows.
Setting Layer Height
Thinner layers produce smoother surfaces and finer detail, but they add print time. Thicker layers print faster at the cost of visible layer lines.
Adding Supports
If your model has steep overhangs, the slicer adds temporary support structures underneath them. Designing around overhang limits earlier means less support material to remove now.
Setting Infill
Infill density controls how solid the inside of your model is. Higher infill means a stronger, heavier part that uses more material and takes longer to print.
Common Mistakes When Making 3D Models for Printing
Most failed prints trace back to a handful of repeat issues in the modeling stage, not the printer itself.
Designing Without Checking Wall Thickness
Thin decorative details that look fine on screen often vanish entirely once a slicer tries to render them at your nozzle's resolution.
Ignoring Overhangs Until Slicing
Steep, unsupported overhangs designed without a plan usually mean ugly support scars on the finished surface, or outright print failure.
Skipping the Mesh Check
A model with holes or flipped normals can sometimes slice without an error message and still print wrong, which makes the mesh check step easy to skip and costly to ignore.
Modeling at the Wrong Scale
Working in the wrong units (millimeters versus inches, for example) is one of the most common reasons a model prints either tiny or far too large.
Licensing: What You Can and Can't Do With a Model
Once you start downloading or sharing files, licensing matters as much as the geometry. Whether you designed the model yourself or downloaded one, check the license before printing it for anyone but yourself.
- Models you design from scratch are yours to print, sell, or share freely
- Many free downloads are licensed for personal use only
- Selling a print made from a "non-commercial" file can create legal issues for you
- A commercial-use license from the original designer clears you to sell prints made from their file
When the license isn't clear, the safest move is asking the original designer directly before printing it for profit.
Conclusion
Learning how to make 3D models for printing comes down to three habits: choosing software that fits your project, designing inside your printer's real physical limits, and checking your mesh before you export. Get those right and most print failures simply stop happening.
Whether you're sketching your first keychain in Tinkercad or building a precision bracket in Fusion 360, the workflow stays the same: design, check, export, slice, print. Once you're comfortable with that loop, you can take on bigger, more ambitious projects with far less trial and error.
For more modeling and printing guides, explore the rest of the Siraya Tech blog, and when your model is ready to print, browse Siraya's resins and filaments to match the right material to your design.
Frequently Asked Questions
What is the easiest way to make a 3D model for printing?
Tinkercad is the easiest starting point. It's free, runs entirely in your browser, and lets you build models by combining basic shapes, so you can have a printable file ready within an hour of opening it for the first time.
Do I need expensive software to design 3D models?
No. Tinkercad and Blender are both free, and Fusion 360 offers a free license for hobbyists. Paid software adds advanced features, but it isn't required to design a fully printable model.
What file format should I export for 3D printing?
STL is the safest default since nearly every slicer supports it. 3MF is a strong alternative if you need to preserve color, multiple materials, or slicer settings alongside the model.
Can ChatGPT or AI tools create a 3D model directly?
Not on their own. AI tools can generate code or scripts that modeling software can use to build shapes, but you still need CAD or mesh software to produce and export an actual printable file.
Why won't my 3D model slice correctly?
The most common causes are a mesh that isn't fully closed, flipped face normals, or self-intersecting geometry. Running your file through a mesh repair tool before slicing catches most of these issues.